# 状态和过渡
用户界面的某些部分通常可以用状态描述。状态定义了一个或多个属性值的变化过程,可以由特定的条件触发。
此外,状态切换可以附加过渡,过渡定义了动画的变化过程或额外执行的动作。动作也可在进入状态时触发。
# 状态
QML 中可通过 State 元素为任意元素定义状态,其值是 states 数组。
状态由名称标识,其最简单的形式由元素的一系列属性修改组成。默认状态由元素的初始属性定义,其名字为 ""(一个空字符串)。
Item {
    id: root
    states: [
        State {
            name: "go"
            PropertyChanges { ... }
        },
        State {
            name: "stop"
            PropertyChanges { ... }
        }
    ]
}
通过为 state 属性赋予一个新的状态名称可以修改状态,这些状态被定义在元素的 states 属性中。
用 when 控制状态
另一种控制状态的方式是通过 State 元素的 when 属性。when 属性可以设置为一个表示式,当其值为 true 时,该状态会被启用。
Item {
    id: root
    states: [
        ...
    ]

    Button {
        id: goButton
        ...
        onClicked: root.state = "go"
    }
}
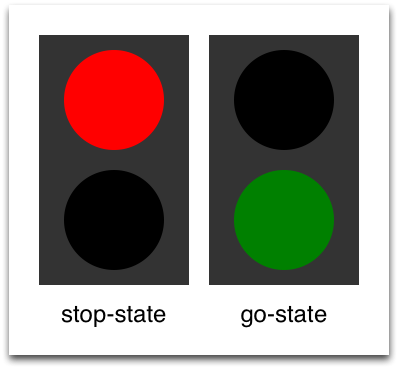
比如,红绿灯有两个信号灯。上方的是意味着禁行的红色,下面的是允许通过的绿灯。在此例中,两个灯不能同时亮。让我们看看状态变化图。
当启动改系统时,它自动进入默认的 stop 状态。停止状态会将 light1 改为红色,light2 改为黑色。
外部事件能将状态改为 go。在启动状态中,light1 的颜色改为黑色,light2 的颜色改为绿色,允许行人通过。
为了更好的理解,我们画了一个包含两个灯的用户界面。为了简单,我们定义了两个矩形,矩形的圆角是宽度的一半(矩形宽和高相同,这意味着着是一个正方形)。
Rectangle {
    id: light1
    x: 25; y: 15
    width: 100; height: width
    radius: width / 2
    color: root.black
    border.color: Qt.lighter(color, 1.1)
}

Rectangle {
    id: light2
    x: 25; y: 135
    width: 100; height: width
    radius: width/2
    color: root.black
    border.color: Qt.lighter(color, 1.1)
}如状态图中所示,我们定义了两种状态:"go" 状态和 "stop" 状态,它们分别将灯的颜色改为绿色或红色。我们将 state 属性改为 stop,确保交通灯的初始状态是 stop。
初始状态
我们可以只定义一个 "go" 状态,通过将 light 设置为红色,light2 设置为黑色达到隐式设置初始状态的目的。由初始属性 "" 定义的状态将和 "stop" 状态一致。
state: "stop"

states: [
    State {
        name: "stop"
        PropertyChanges { target: light1; color: root.red }
        PropertyChanges { target: light2; color: root.black }
    },
    State {
        name: "go"
        PropertyChanges { target: light1; color: root.black }
        PropertyChanges { target: light2; color: root.green }
    }
]
示例中其实不太需要 PropertyChanges { target: light2; color: "black" },因为 light2 的初始颜色早就是黑的。对于状态来说,它只需说明属性是如何从默认状态改变的,而不是从上一个状态。
通过点击覆盖信号灯的 MouseArea 可以切换 "go" 和 "stop" 状态。
MouseArea {
    anchors.fill: parent
    onClicked: parent.state = (parent.state == "stop" ? "go" : "stop")
}
现在我们能成功地切换信号的状态。为了让 UI 更加自然和吸引人,我们需要添加一些动画过渡效果。过渡可在状态切换时触发。
使用脚本
可以通过脚本而不是 QML 状态来实现类似的逻辑。不过,相对 JavaScript 来说,QML 是一门更好的描述用户界面的语言。你应该尽可能地写声明式代码,而不是命令式代码。
# 过渡
每个元素可以应用一堆过渡。过渡可在状态切换时被执行。
你可以通过 from: 和 to: 属性定义状态变化时应执行哪个过渡。这俩属性的行为类似过滤器:当过滤结果为真时,过渡会被执行。你也可以使用通配符 "*",这意味着匹配任何状态。
比方说,from: "*"; to: "*" 意味着从任意状态到任意状态,且这是 from 和 to 的默认值。这意味着每次状态切换时都会应用过渡。
例如,当状态由 "go" 变为 "stop" 时,在颜色改变时,我们希望应用过渡。而反向的状态变化("stop" 到 "go")时,我们希望颜色立刻变化,不应用过渡。
我们通过 from 和 to 属性限制过渡仅在状态由 "go" 变为 "stop" 时触发。在过渡内部,我们为每个灯添加了两个颜色动画,它们将应用状态定义中定义的属性变化。
transitions: [
    Transition {
        from: "stop"; to: "go"
        // from: "*"; to: "*"
        ColorAnimation { target: light1; properties: "color"; duration: 2000 }
        ColorAnimation { target: light2; properties: "color"; duration: 2000 }
    }
]
可以点击 UI 切换状态。状态会立刻应用,过渡运行期间也能改变状态。可以试试在 "stop" 转变至 "go" 的过渡期间点击界面。你可以看到变化立刻发生。

你可以玩玩这个 UI,比如,将不活跃的灯缩小,以突出活动灯。
为此,你需要为过渡添加另一个这对缩放属性的变化,处理过渡时 scale 属性的动画。
另一个选项是添加一种“注意”状态,此时为闪烁的黄灯。为此,你需要在过渡中添加串行动画,一秒后变为黄色(动画的 "to" 属性,一秒后变为黑色)。
也许你还想改变缓动曲线,使其更具视觉吸引力。